NOTE: This feature currently works properly in BeetleDC Libretro non-OIT. BeetleDC Libretro OIT will require some more work before this feature will start rendering properly.
Thanks to RetroSven, here is another major new feature!
It is now possible to display the VMU screen ingame! You can also specify the exact positioning of each VMU, whether it should be positioned at the top left, top right, bottom left, or bottom right corner of the screen. You can also specify the opacity of each screen and the exact size of the screen. You can display all 4 attached VMU screens at the same time onscreen!
For those that don’t know, the VMU was the Dreamcast’s memory card which also could be used as a standalone device. It was powered by a ring battery, had a D-pad and some face buttons, and it was even possible to play some minigames on the VMU.Games could download VMU minigames onto the system and you could then play these minigames when used as a standalone device.
Samurai Shodown VI (NAOMI) renders properly now with Extra Depth Scaling option!
Reicast Libretro now has a new feature – Extra Depth Scaling. By enabling this, the graphics in Samurai Shodown VI (Naomi arcade game) will render properly.
Note that even with this enabled, BeetleDC OIT Libretro will currently have some display bugs that the non-OIT core won’t have. Hopefully the two can become just as good later on.
RetroArch with Metal 2 support for macOS High Sierra users!
Up until now, we had three versions of RetroArch for macOS/OSX users:
RetroArch for OSX PowerPC (10.5) – For users with an old PowerMac or iBook/Powerbook. You should have at least Mac OS X version 10.5 (Leopard) installed in order for this version to work. Cores are packaged with this version because our buildbot does not serve fresh 32bit PowerPC cores for OSX.
RetroArch for OSX 32bit Intel (10.6) – For users with an old MacBook that has a 32bit Intel processor (for instance, 1st generation MacBook). In order to use this, you should have at least MacOS X version 10.6 (Snow Leopard) installed. Cores are packaged with this version because our buildbot does not serve fresh 32bit Intel cores for OSX.
RetroArch for macOS/OSX 64bit Intel (10.6) – This is what you are likely wanting to use on a modern Mac computer. You should have at least MacOS X/macOS version 10.7 (Lion) installed. Cores are distributed separately on our buildbot.
We are now adding a fourth one:
RetroArch for macOS 64bit Intel with Metal 2 support (10.13) – This version has all of the features of ‘RetroArch for macOS/OSX 64bit Intel’ plus a Metal 2 video driver. This version requires at least macOS 10.13 (High Sierra), a fairly modern version of macOS. For this version, we default to the Metal video driver by default.
If you have relatively modern Mac and you want to enjoy the latest in cutting edge technology, you should definitely try out this latest version. Get it by going to our Downloads page, and click on the download link below macOS High Sierra (or later).
Up until the ’10s, Mac OS X has relied on the crossplatform OpenGL API to provide hardware accelerated rendering to developers writing Mac applications. However, since 2014, there has been an industry-wide push towards lower-level APIs, and Apple in specific decided to go with its own proprietary graphics API. This API is called Metal, and was first premiered with iOS 7 and Apple A7 devices. It has since some years ago made the switch to macOS as well, and this year the API has been bumped to version 2.
Apple has announced OpenGL will be deprecated in the future, its graphics driver stuck with the dated OpenGL 4.1 spec for years now. While we regret this industry wide push away from a standardized, cross-platform graphics API, we have been forced to move with the times and instead cater to all the major graphics APIs. There is no longer the potential for one single graphics API to cater to all platforms.
With the release of RetroArch 1.7.4, we have achieved an important milestone: we now have fully functioning graphics drivers for the three major next-generation graphics APIs. This includes Khronos’ Vulkan API (added to RetroArch since 2016), Microsoft’s Direct3D 11/12 (added to RetroArch since earlier this year), and now Apple’s Metal 2 for macOS. Thanks to Hans-Kristian Arntzen’s SPIRV-Cross middleware, we can reuse the same shaders across Direct3D/Vulkan/Metal. We therefore are very close to having a universal shader specification that will work on all the major platforms.
We are now ready for a future when Apple will outright kill OpenGL support, while at the same time we have ensured that we have one common set of shaders that can be used across all these video drivers. The developer who has added Metal 2 support to RetroArch has already indicated he intends to bring this over to iOS and tvOS as well. And who knows, maybe even backwards compatibility with Metal 1 could arrive.
How complete is the Metal video driver right now?
Fairly complete. You get:
Fully functioning menu drivers. XMB, MaterialUI and RGUI should work fine.
XMB shader pipeline effect should work as expected.
You can take screenshots.
You can go into fullscreen mode.
You can use slang shaders with the Metal video driver, the same shaders that can be used with Vulkan/D3D10/D3D11/D3D12.
Things that have still yet to be added which the author is considering adding:
Recording support independent of ffmpeg.
Support for the libretro API’s RETRO_ENVIRONMENT_GET_CURRENT_SOFTWARE_FRAMEBUFFER.
Hardware renderer context support, so that libretro cores could make use of the Metal API.
General changelog
– COMMON: Support for “OEM-102” key (usually ‘\’ on Euro keyboards).
– MENU/QT/WIMP: Add option to filter extensions inside archives when adding to a playlist.
– METAL: Add screenshot support.
RetroArch 1.7.4 has just been released! Grab it here.
This latest version has also been uploaded to the Google Play Store. This is the 32bit version. We also have a brand new 64bit version for users with 64bit capable devices. You can grab that one here. More on that version later!
If you’d like to show your support, consider donating to us. Check here in order to learn more.
Highlights
64bit version of RetroArch Android
We have just uploaded a 64bit version of RetroArch for Android on the Google Play Store. You should be able to get it either from Google Play, or you can get it from our Download page, available here.
This 64bit version is intended for users with 64bit capable Android devices. Shield ATV would be one of those examples but there are doubtless many others. You can install the 32bit version and 64bit version at the same time on your device. Let us run down the list of what you need to know:
Certain cores are going to be exclusive to 64bit. Dolphin is one of those examples, since it lacks a 32bit dynarec entirely and Team Dolphin has no intention of supporting these devices. So for certain cores, 64bit will be the only place to go.
Some cores are actually significantly faster with 64bit. Beetle PSX for instance is significantly faster with the 64bit version vs. the 32bit version.
Some cores that only have a 32bit dynarec and/or were specifically optimized might be significantly faster on 32bit instead. Dosbox SVN is one of those examples, as is PCSX ReARMed and Picodrive. To help avoid confusion, we are going to be documenting this on our Libretro Docs site. It’s not there yet but it will be in the upcoming days/weeks.
Discord integration
RetroArch 1.7.4 now has extended Discord RPC integration! Previously before 1.7.4, RetroArch would act as any other game in Discord: as a simple “Playing” status that said you had RetroArch open. It wasn’t very descriptive or helpful other than displaying the name “RetroArch”. With the 1.7.4 update, RetroArch will display more information beyond a simple “Playing” status!
Read the blog article below for a more detailed indepth article on this feature:
NOTE: The Desktop UI is currently only available for Linux and Windows. macOS support might arrive at a later date.
Where to even begin? Let’s just have the videos do the talking –
Grid view with Thumbnails
You can now choose between List and Grid View. Grid View will show thumbnails of all your games, provided you have them installed. You can always install thumbnail packs separately by going to Online Updater and selecting Thumbnail Updater.
Create new playlists easily by drag and drop!
RetroArch 1.7.4 will make creating new playlists from scratch easy as pie! No longer will you be forced to manually select a directory and scan for games; you can now create a new playlist, and then manually drag and drop the roms you want to have in that playlist over to them, and the WIMP UI will do the manual work for you!
(Windows only for now) In-app RetroArch update!
From version 1.7.4 on, it will now be possible to update RetroArch to the latest nightly versions!
Live shader editing with the desktop UI!
Starting as of RetroArch 1.7.4, it is now possible to use the desktop UI to setup your shaders! You are able to add a shader preset and stack additional passes to your shader stack! You are also able to remove any shader passes you please, change shader parameters on the fly, and even reset shader parameters to their default values by pressing the right mouse button on a shader parameter and selecting ‘Reset Parameter’.
Download all thumbnails for a playlist with Desktop UI!
Previously, it was only possible to download complete thumbnail packs per system/game category. The most obvious complaint about this for many people was that they only needed thumbnails for specific games they actually have in their collection.
Now with RetroArch 1.7.4, from inside the Desktop UI you can right click any content from any playlist, select ‘Download thumbnails’, and it will try to fetch the thumbnails for this content from the Github thumbnail repositories.
You can now rightclick on a playlist, select ‘Download All Thumbnails’ – This Playlist, and it will attempt fetching all the thumbnails for a given playlist! You can also cancel this operation at any time by either pressing the Cancel button on the dialog box, or pressing the ‘X’ icon.
Core options in desktop UI!
When you have a core loaded, you can now change the core options inside the Desktop UI!
NOTE: If you leave the core option dialog window open and you happen to unload a core then launch a new core with game, you will have to close the dialog and then reopen it again. It won’t reload itself automatically. This might get looked at in a later version.
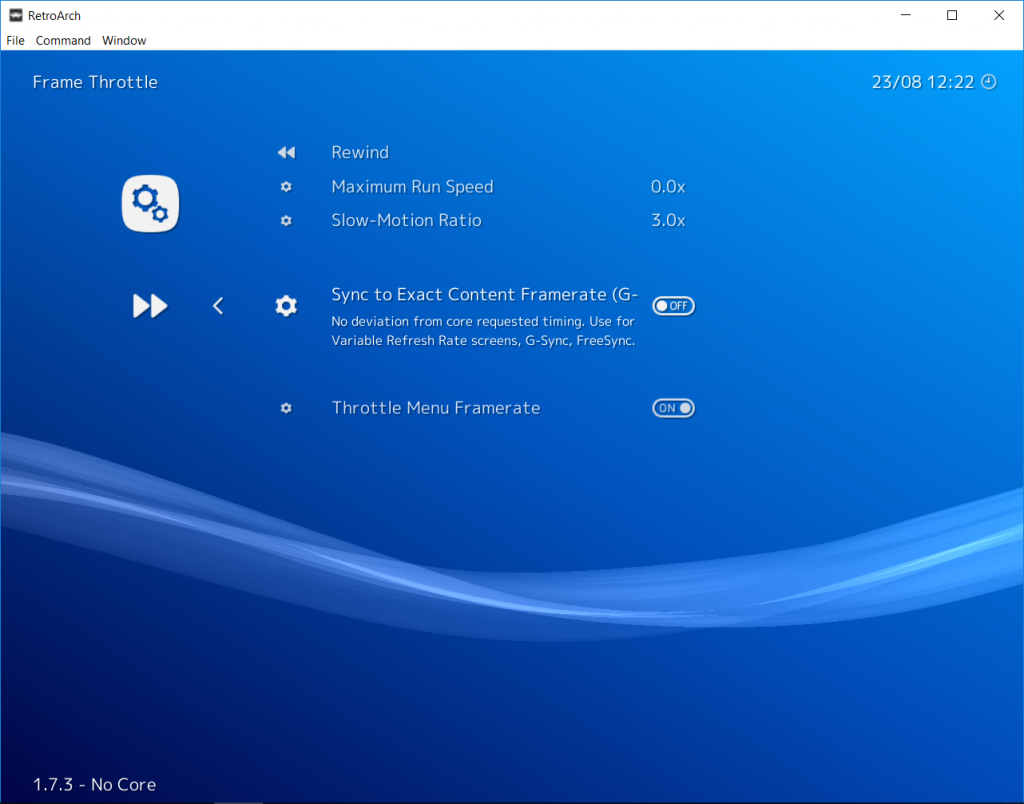
Sync To Exact Content Frame Rate – Ideal for G-Sync/FreeSync users!
Blog post written by Tatsuya79
RetroArch 1.7.4 has a new feature that will be especially advantageous to users of variable sync display technologies, such as G-Sync/FreeSync. We call it “Sync to Exact Content Framerate”.
Read the blog article below for a more detailed indepth article on this feature:
– ANDROID: Add sustained performance mode, can be turned on/off in Power Management settings menu.
– ANDROID: Powerstate/battery level support.
– CHEEVOS: Fix crash when scrolling Achievement List while Unofficial Achievements enabled (#6732).
– CHEEVOS: Added hitcounts support for PauseIf/ResetIf (#6817).
– COMMON: Automatically hide “Configuration Override options” in Quick Menu.
– COMMON: Small Bugfix to not trigger savestate code when pressing Reset.
– COMMON: Added libsixel video driver.
– EMSCRIPTEN: Fix Game Focus Toggle.
– HID/OSX: Fix to set hid device registration deterministic (#6497), to address issue #6640 re-adding dynamic device registration.
– LOCALIZATION: Update Italian translation.
– LOCALIZATION: Update Japanese translation.
– LOCALIZATION: Update Polish translation.
– LOCALIZATION: Update Portuguese / Brazilian translation.
– LOCALIZATION: Update Russian translation.
– LOCALIZATION: Update Spanish translation.
– MIDI: Add MIDI support to the libretro API. Dosbox is the first proof of concept core implementing libretro MIDI.
– MIDI: Add a Windows driver for MIDI, based on winmm.
– MENU/QT/WIMP: Qt QSlider styling for Dark Theme.
– MENU/QT/WIMP: Remove button ghostly inside highlighting.
– MENU/QT/WIMP: Initial grid view.
– MENU/QT/WIMP: Drag&drop to add new playlist items, add option to add/edit/delete playlists.
– MENU/QT/WIMP: Add menu option to update RetroArch (Windows only for now).
– MENU/QT/WIMP: Add menu option to manage shaders.
– MENU/QT/WIMP: Add menu option to manage core options.
– MENU/XMB: Add new icons for the settings
– MENU/XMB: Add an option to show the desktop ui
– METAL: Initial work-in-progress video driver for Metal. macOS-only right now, and currently requires macOS 10.13.
– METAL: Supports XMB/MaterialUI, has a menu display driver. Has a font rendering driver.
– METAL/SLANG: Slang shaders should be compatible with Metal video driver.
– NETWORK: Enable SSL/TLS support by default for desktop platforms.
– QNX: Fix Game Focus Toggle.
– PS3: Add audio mixer support for FLAC and MP3.
– PSP: Use proper button labels, fix inverted R-Stick Y axis.
– REMAPS: Fix the way offsets are calculated for keyboard remapping.
– RUNAHEAD: Fix full-screen mode change breaking Secondary Core’s environment variables.
– RUNAHEAD: Deterministic input for RunAhead, guaranteed to match the last polled.
– VITA: Use proper button labels, fix inverted R-Stick Y axis.
– VITA: Add imc0: mount.
– VITA: Use sceCtrlIsMultiControllerSupported to detect.
– VULKAN: Fix two validation errors.
– VULKAN: Try to avoid creating swapchains redundantly. Should fix black screen and having to alt tab out of window again to get display working on Nvidia GPUs (Windows).
– VULKAN/OSX: Initial MoltenVK support. Not enabled yet, several MoltenVK bugs should be fixed first before we can have it fully working.
– WINDOWS/DINPUT: Add rumble support.
– WINDOWS/DINPUT: Fix Game Focus Toggle.
– WINDOWS/RAWINPUT: Fix Game Focus Toggle.
– X11: Fix Game Focus Toggle.
– WII: Change deflicker setting to work in 480p or higher, and always enables vfilter so that the user can easily change brightness.
– WIIU: Fix out-of-bounds rendering bug
– WIIU: Implement UDP broadcast network logging on Wii U.
– WIIU: Audio should no longer clip.
Post written by RetroSven
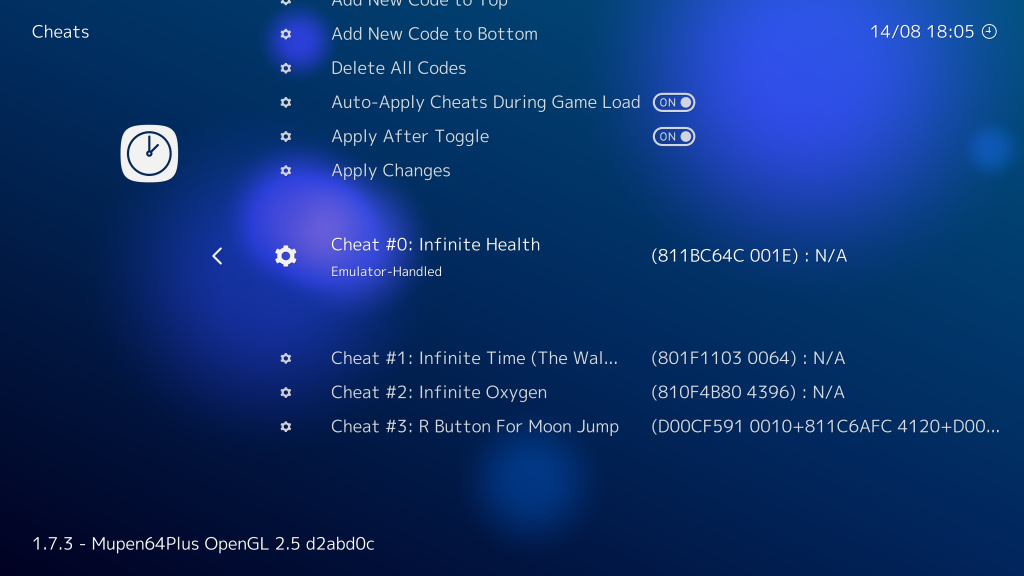
RetroArch 1.7.4 has built-in cheat code searching/creating. Additional cheat system updates:
“Load Cheats” has been broken into two separate options. One will replace the list of cheats with what is being loaded whereas the other will append to the list of cheats with what is being loaded.
Cheat list is now automatically saved and loaded for each game
When using left/right to change the values of numbers, there is now a feature that gradually increases the step-size the longer you hold the button
Full cheat list management – Edit, Delete, Copy, Add, (to top of list, to bottom of list, above entry, below entry)
There are now two different cheat types – Emulator (handled by the emulator, the original type) and the new type – RetroArch – that is handled by RetroArch itself
Option to reload cheat file (if you manually edit file while RA is running)
Option to auto-apply cheats when loading game
Option to auto-apply cheats when toggling them on/off
Robust cheat searching interface (see instructions below) which works for just about every RA core
Rumble activation based on memory changing. For example, after finding the memory location for the number of lives in a game (via the cheat searching interface) you can set it up such that every time the value decreases (lose a life) the controller rumbles. Rumble tested with X360 controller, input driver dinput, joypad driver xinput. Available rumble controls:
Rumble when memory value changes
Rumble when memory value does not change
Rumble when memory value decreases
Rumble when memory value increases
Rumble when memory value = value
Rumble when memory value != value
Rumble when memory value < value
Rumble when memory value > value
General Guideline for Finding New Cheats:
Start game.
Go to Quick Menu -> Cheats -> Start or Continue Cheat Search.
Use left/right on “Start or Restart Cheat Search” to select a bit-size appropriate to the console you are using and the value your are searching.
For example, if you are playing Castlevania:SOTN on the PS1 and you want to search for the health value, then that’s a value that can be greater than 255 (0xFF), but it’s unlikely that the game developers anticipated a value larger than 65535 (0xFFFF) so set the search to 16-bit.
An alternate example – if you are playing Space Invaders on Atari 2600 and you want to search for the number of lives, then that’s a value that could possibly be stored in just 2-bits of data (max number of lives = 3) and since the Atari 2600 only has a very small memory space, it’s entirely possible that the memory location for the number of lives is only partially stored in a single byte while the rest of that same byte may store other important data that should not be touched. Set the size to 2-bit.
Select “Start or Restart Cheat Search” once you have selected the bit size
Go back to the game and lose a life
Go back to the quick menu and select “Search Memory For Values … Less Than Before” because when you started the search you had one more life than you do now. You could also try “Search Memory For Values … Equals To Before-1”. The number of matches should go down.
If the number of matches is still too great to peruse, then perform actions 5 and 6 repeatedly until the number of matches is something you feel comfortable trying (e.g. 10). If you run out of lives, just reset the game or restore a save state. Then your lives will likely be greater than the last time you checked, so select “Search Memory For Values … Greater Than Before”
Once you have a manageable list, select “Add the ## Matches to Your List”
Go back one menu to see the codes that have been added. Try turning just one on at a time to see if it has the desired effect. If not, turn it off and try the next one. One of them should be the location in memory that stores your number of lives and enabling the cheat in its default state will result in that memory location being overwritten by the cheat value continuously and voila infinite lives.
Alternately, you can “Search Memory For Values … Equal to ###” if you know the exact number (e.g. the number of hit points you have in an RPG).
Over 1000 new cheat and rumble codes added to the database across the following systems:
Atari 5200
Atari 7800
Atari 400/800/1200XL
ColecoVision
MSX/MSX2
NES
SNES
Sega Master System
Sega Genesis
TurboGrafx-16/PC-Engine
Incidentally, as a result of all this work, RetroSven also implemented savestate/serialization support for the mainline MAME core, and Reicast!
Many thanks to madmab, Bombbloke, Gilou9999, Bigby, Megaman_? for providing cheat and rumble codes for several different systems!
RetroArch 1.7.4 has a new feature that will be especially advantageous to users of variable sync display technologies, such as G-Sync/FreeSync. We call it “Sync to Exact Content Framerate”.
This option is the equivalent of forcing x1 speed while still allowing fast forward.
There will be no deviation from the core requested refresh rate alongside sound Dynamic Rate Control (the default RetroArch behaviour outside of this setting).
It should adapt to any refresh supported by your screen and provide smooth scrolling.
Steps to take for it to be effective:
Have G-Sync/FreeSync active in your video driver control panel and monitor menu
In RetroArch, set “Video” -> “Vertical Refresh Rate” to your monitor frequency
(you can use “set display reported refresh rate” as it should give you your desktop refresh rate)
Activate “Frame Throttle”-> “Sync to Exact Content Framerate (G-Sync, FreeSync)”
Keep V-Sync active in Settings -> “Video”, it won’t work with it disabled.
Core-specific hints
MAME needs “Enable Throttle” in its core options to give the exact game timing.
Genesis Plus GX needs “System Region” set to “PAL” in its core options to switch to 50Hz. It doesn’t seem to be able to do it automatically.
This setting is not a silver bullet though, and it relies on the core to have proper frame timing. As a result, currently this setting can’t fix the frame pacing issues some cores suffer from (mGBA and Reicast have some at the moment).
Cookie Consent
We use cookies to improve your experience on our site. By using our site, you consent to cookies.
Websites store cookies to enhance functionality and personalise your experience. You can manage your preferences, but blocking some cookies may impact site performance and services.
Essential cookies enable basic functions and are necessary for the proper function of the website.
Name
Description
Duration
Cookie Preferences
This cookie is used to store the user's cookie consent preferences.
30 days
Statistics cookies collect information anonymously. This information helps us understand how visitors use our website.
Google Analytics is a powerful tool that tracks and analyzes website traffic for informed marketing decisions.
Contains information related to marketing campaigns of the user. These are shared with Google AdWords / Google Ads when the Google Ads and Google Analytics accounts are linked together.
90 days
__utma
ID used to identify users and sessions
2 years after last activity
__utmt
Used to monitor number of Google Analytics server requests
10 minutes
__utmb
Used to distinguish new sessions and visits. This cookie is set when the GA.js javascript library is loaded and there is no existing __utmb cookie. The cookie is updated every time data is sent to the Google Analytics server.
30 minutes after last activity
__utmc
Used only with old Urchin versions of Google Analytics and not with GA.js. Was used to distinguish between new sessions and visits at the end of a session.
End of session (browser)
__utmz
Contains information about the traffic source or campaign that directed user to the website. The cookie is set when the GA.js javascript is loaded and updated when data is sent to the Google Anaytics server
6 months after last activity
__utmv
Contains custom information set by the web developer via the _setCustomVar method in Google Analytics. This cookie is updated every time new data is sent to the Google Analytics server.
2 years after last activity
__utmx
Used to determine whether a user is included in an A / B or Multivariate test.
18 months
_ga
ID used to identify users
2 years
_gali
Used by Google Analytics to determine which links on a page are being clicked
30 seconds
_ga_
ID used to identify users
2 years
_gid
ID used to identify users for 24 hours after last activity
24 hours
_gat
Used to monitor number of Google Analytics server requests when using Google Tag Manager
1 minute
Marketing cookies are used to follow visitors to websites. The intention is to show ads that are relevant and engaging to the individual user.
A video-sharing platform for users to upload, view, and share videos across various genres and topics.
Registers a unique ID on mobile devices to enable tracking based on geographical GPS location.
1 day
VISITOR_INFO1_LIVE
Tries to estimate the users' bandwidth on pages with integrated YouTube videos. Also used for marketing
179 days
PREF
This cookie stores your preferences and other information, in particular preferred language, how many search results you wish to be shown on your page, and whether or not you wish to have Google’s SafeSearch filter turned on.
10 years from set/ update
YSC
Registers a unique ID to keep statistics of what videos from YouTube the user has seen.
Session
DEVICE_INFO
Used to detect if the visitor has accepted the marketing category in the cookie banner. This cookie is necessary for GDPR-compliance of the website.
179 days
LOGIN_INFO
This cookie is used to play YouTube videos embedded on the website.
2 years
VISITOR_PRIVACY_METADATA
Youtube visitor privacy metadata cookie
180 days
You can find more information in our Cookie Policy and .