Lakka 3.4 has just been released! To learn more, check out this article on our sister site Lakka.tv here.
This version is based on the latest RetroArch version, 1.9.9 (which was released earlier today).


RetroArch 1.9.9 has just been released.
Grab it here.
If you’d like to learn more about upcoming releases, please consult our roadmap here. The next version of Lakka (with an updated RetroArch 1.9.9 version) is scheduled to be released very soon!
Remember that this project exists for the benefit of our users, and that we wouldn’t keep doing this were it not for spreading the love to our users. This project exists because of your support and belief in us to keep going doing great things. If you’d like to show your support, consider donating to us. Check here in order to learn more. In addition to being able to support us on Patreon, there is now also the option to sponsor us on Github Sponsors! You can also help us out by buying some of our merch on our Teespring store!
We have now added HDR (High Dynamic Range) support to RetroArch’s Direct3D 11/12 driver thanks to a generous contributor!
What you should know:
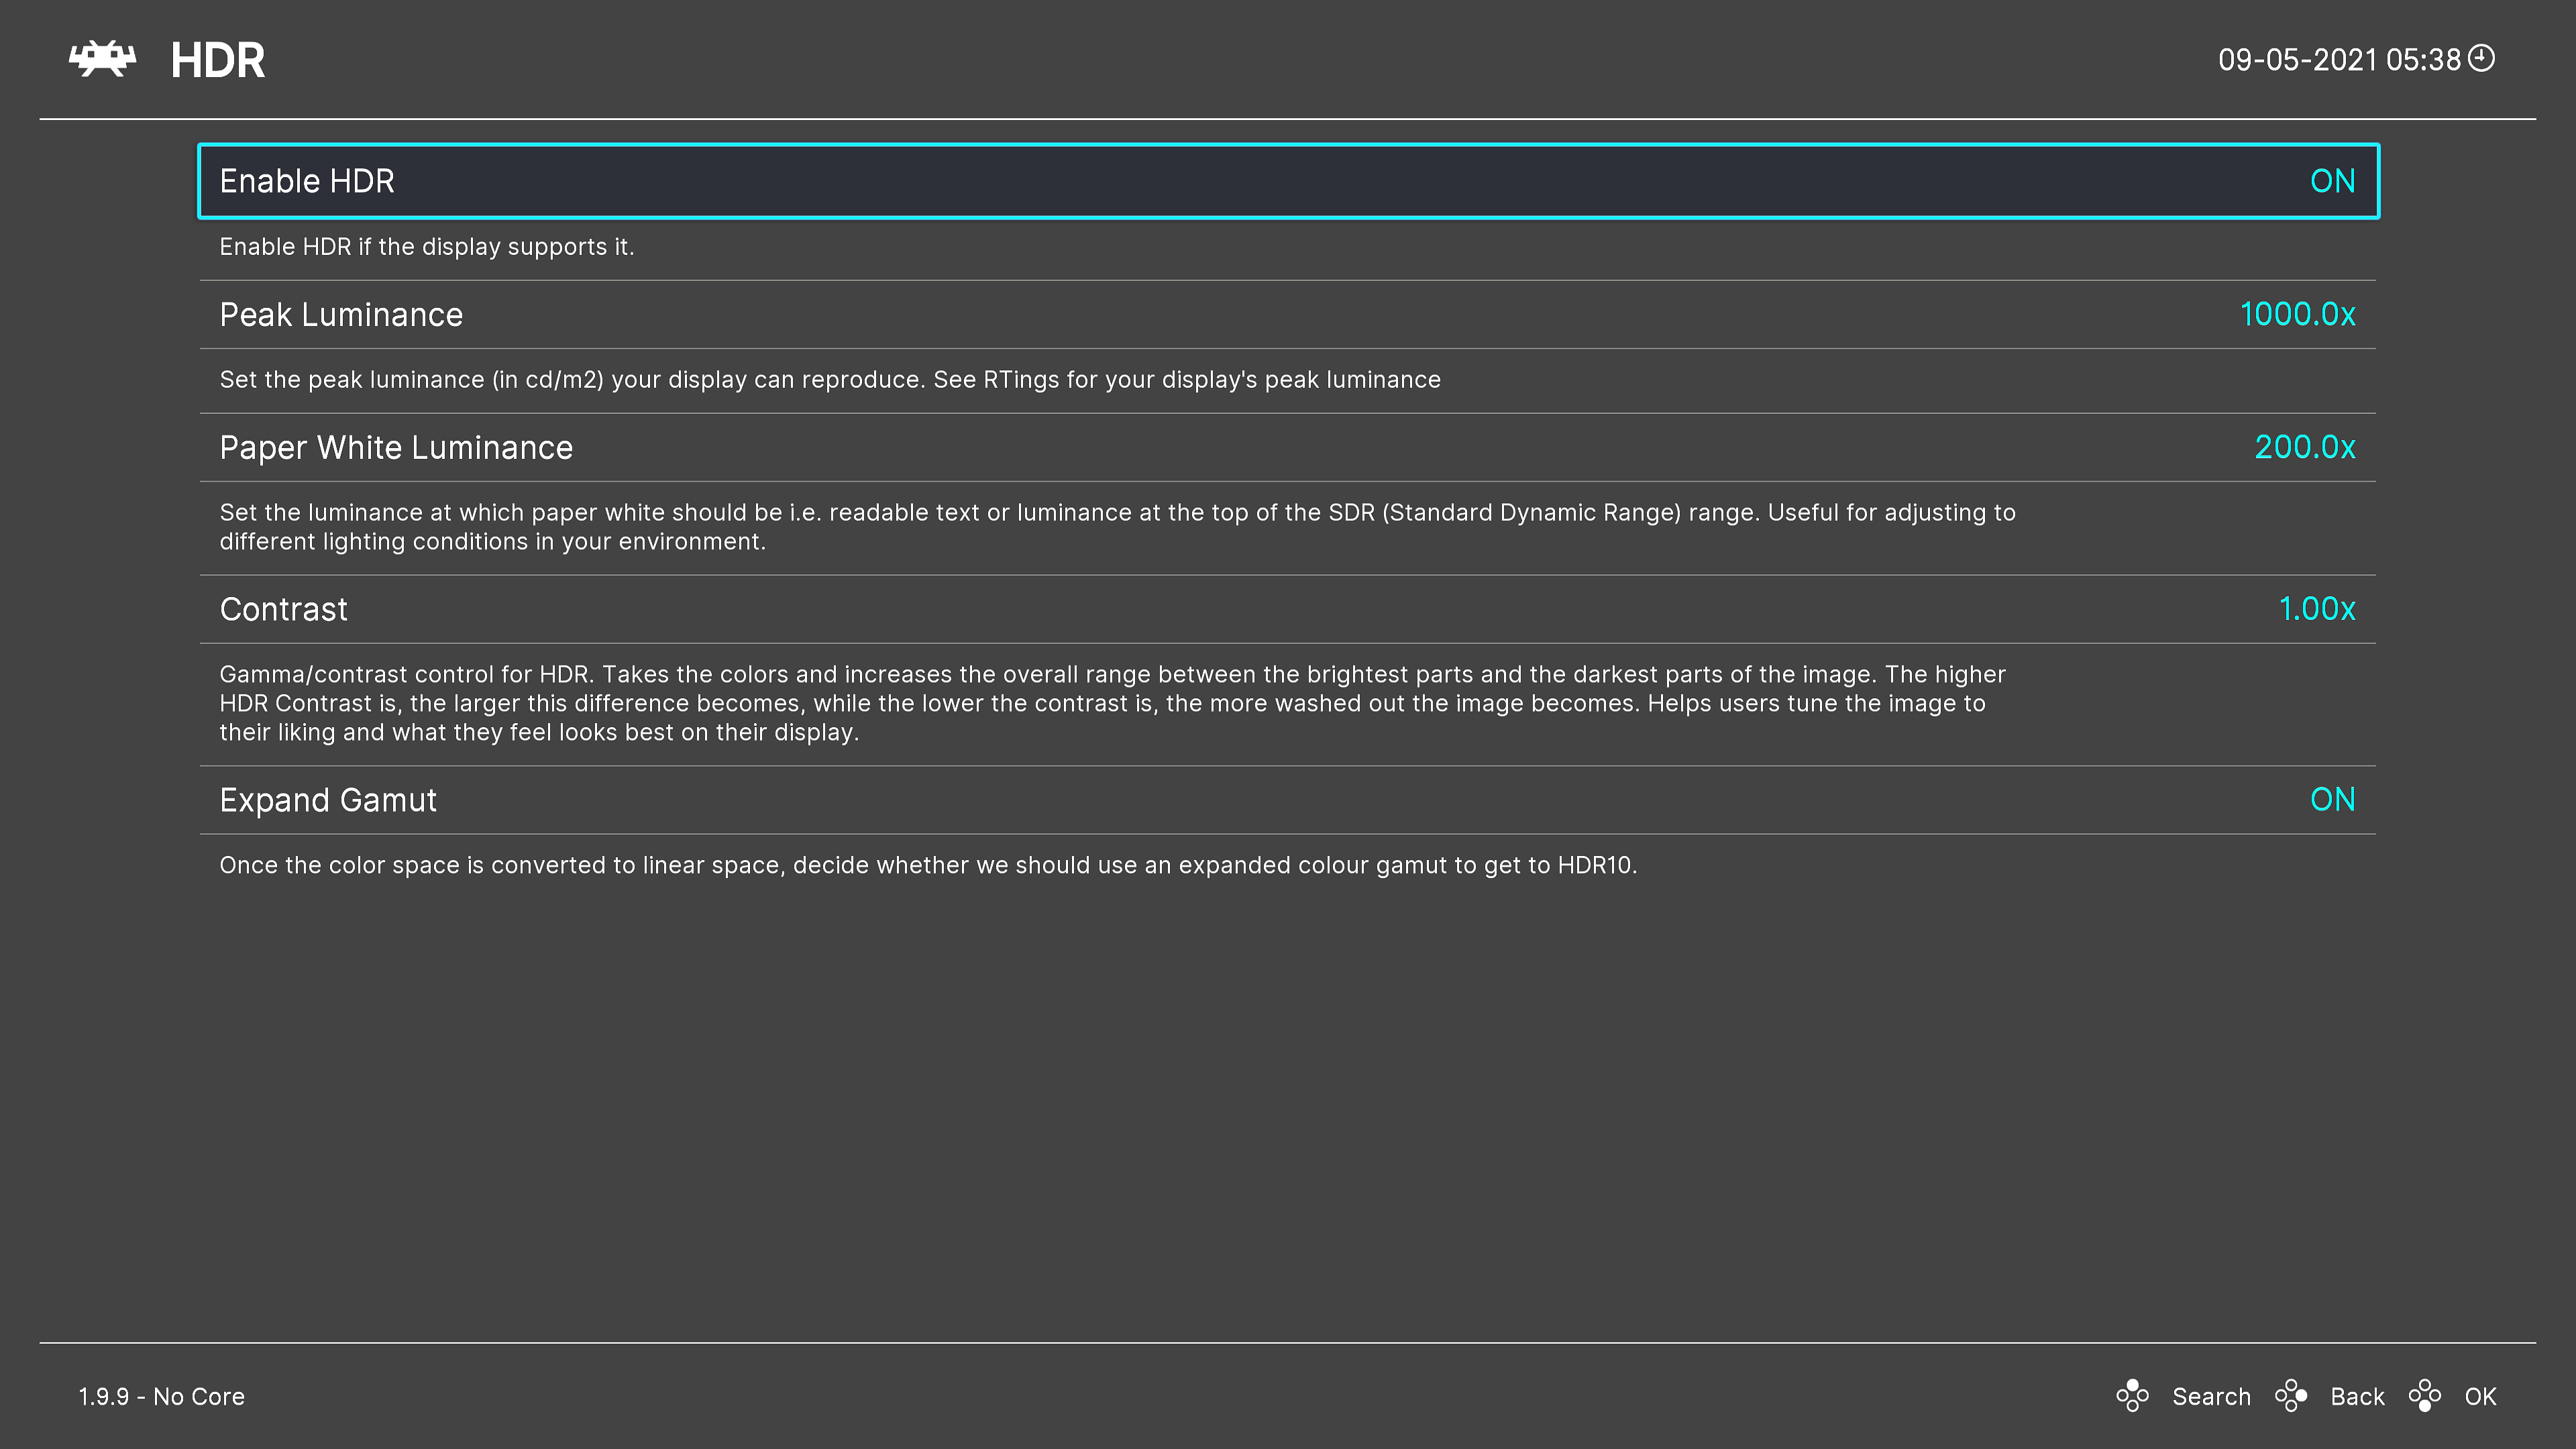
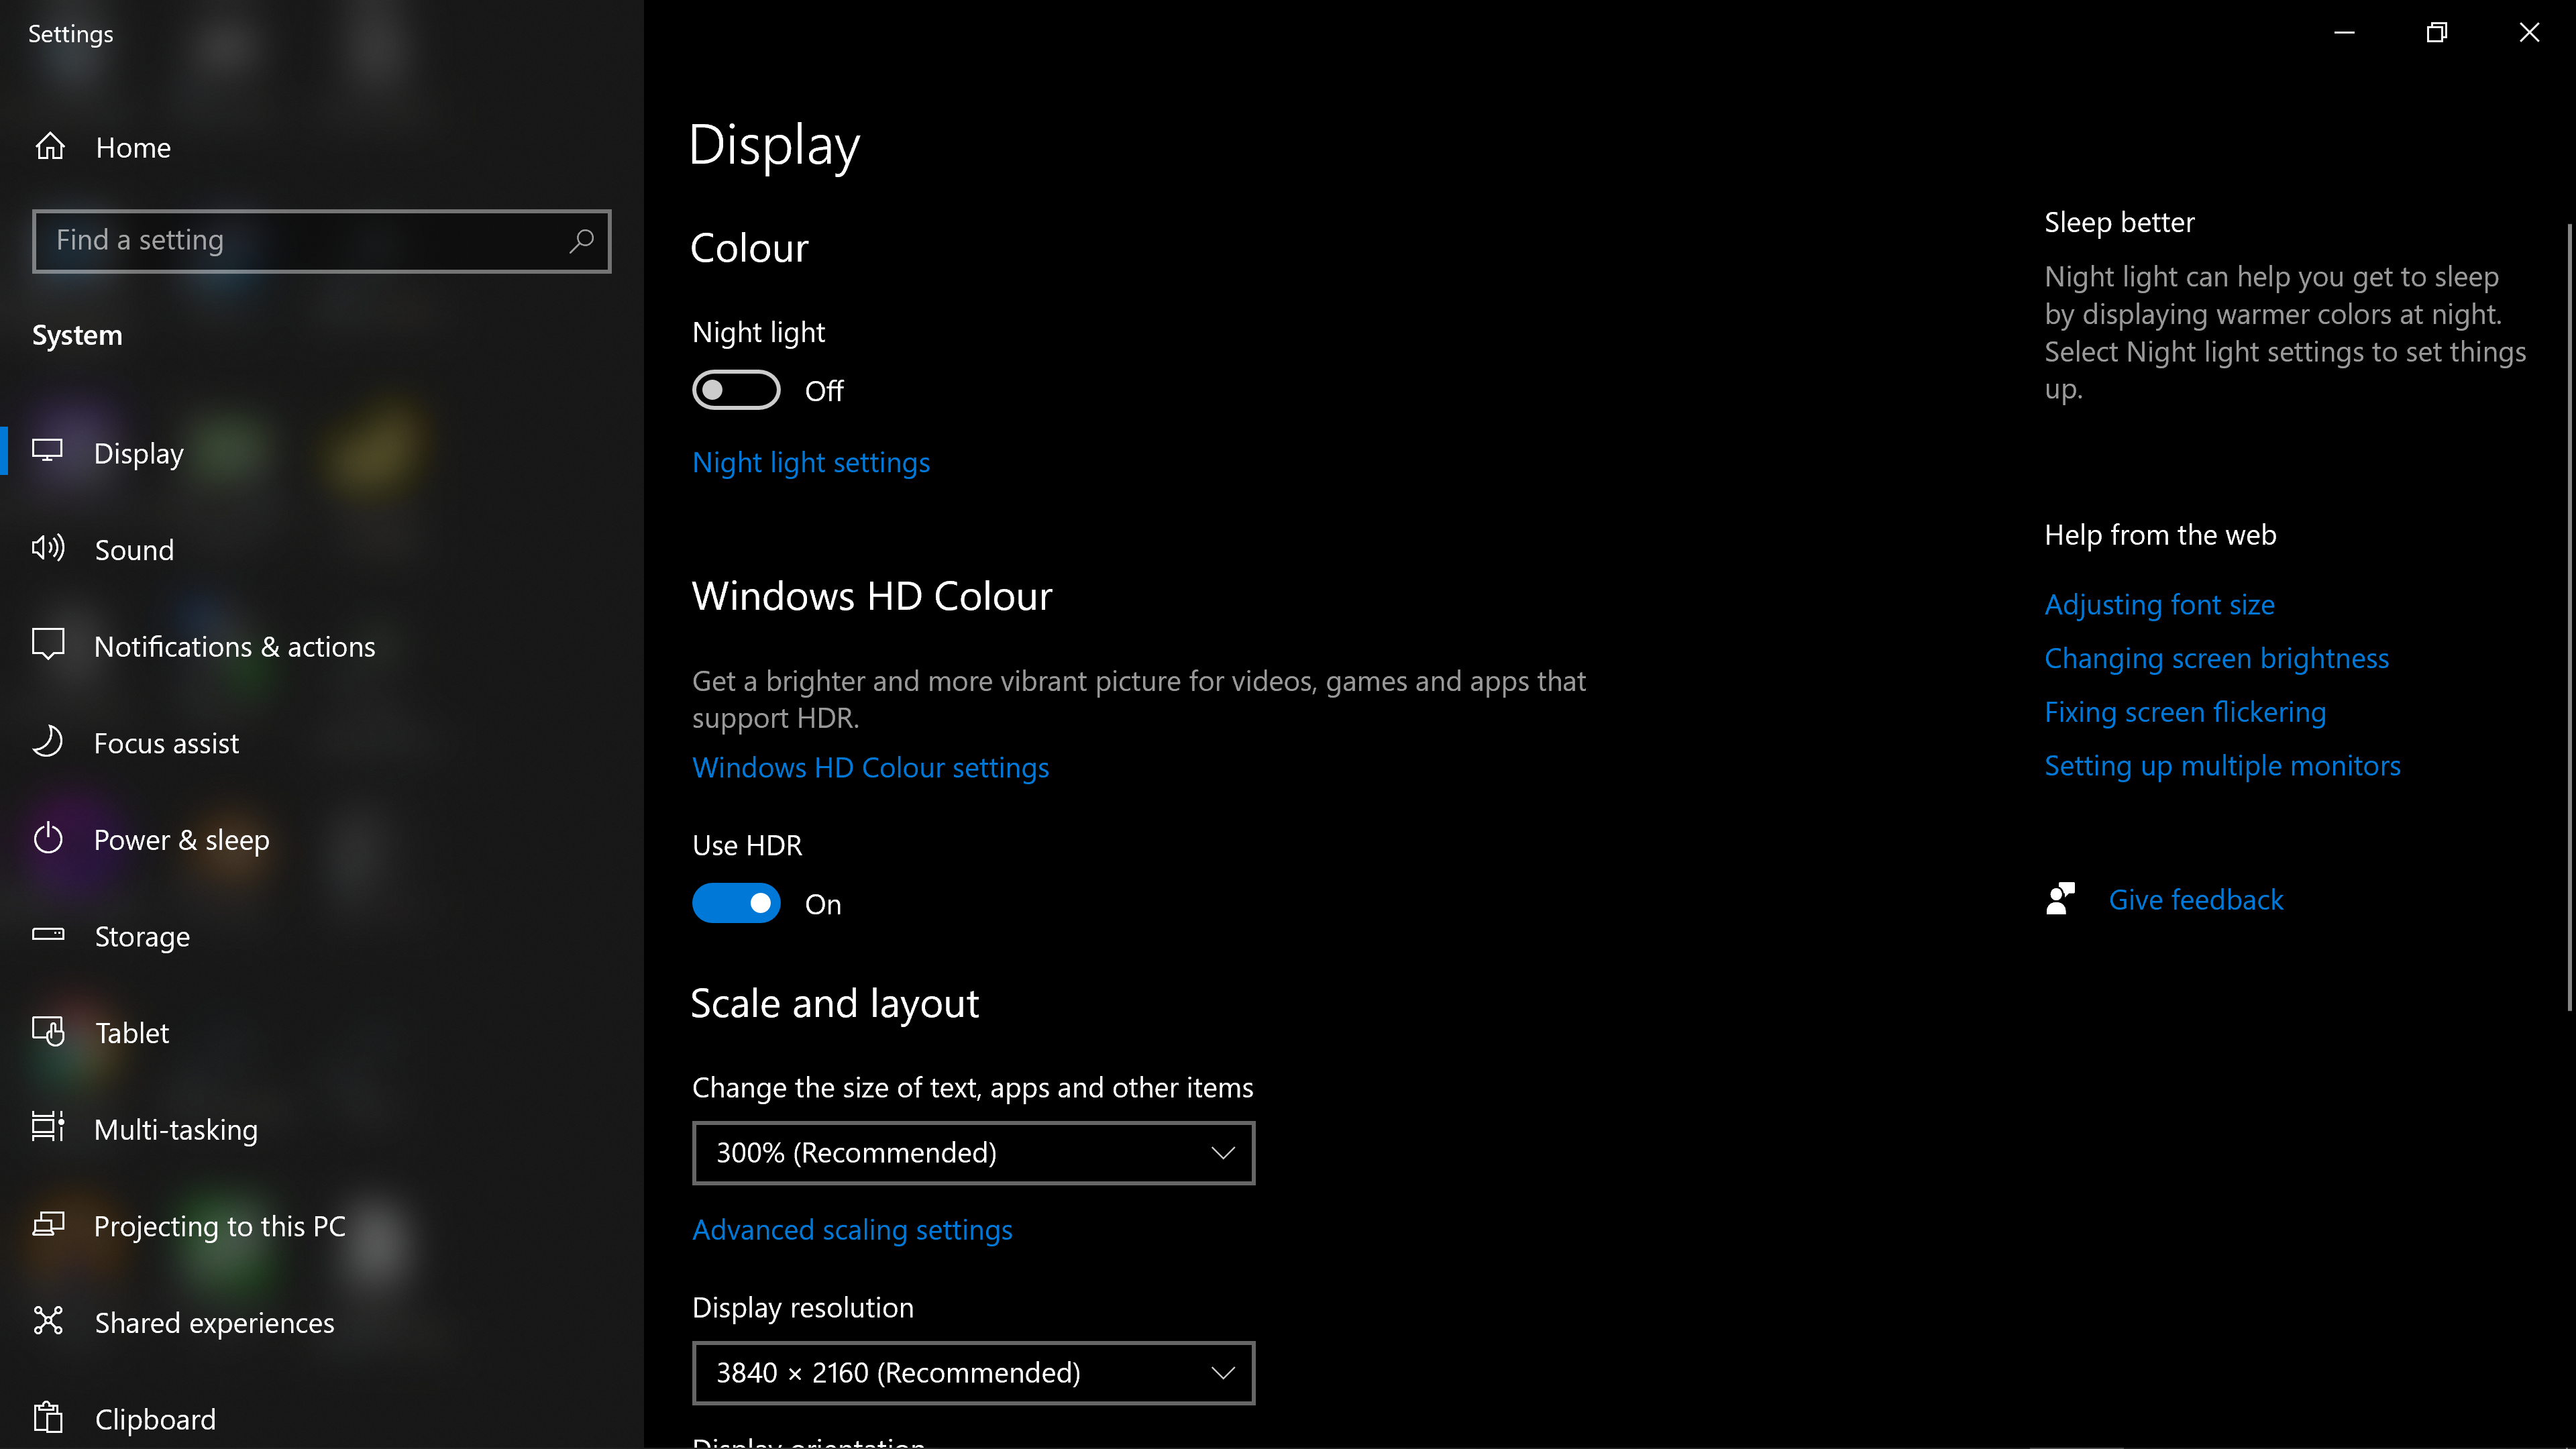
* The HDR settings can be found in Settings -> Video when you are using the Direct3D 11 or 12 driver. In order to change to D3D11/12, go to Settings -> Drivers, and change Video to ‘D3D11/12’.
In case you don’t see the option, and you have made sure first that your driver is set to Direct3D 11/12, it might be that HDR is disabled in Windows 10. Make sure HDR is enabled in Windows in case you don’t see it pop up. In Windows, go to ‘Display Settings’ (pictured below) and make sure the HDR setting is turned on. If it doesn’t show up, your display device might simply not support HDR.
* We now let Direct3D 11 compile frontend shaders against Shader Model 5.0 (SM 5.0) in case your graphics card driver supports D3D11 Feature Level 11.0 or higher. Previously, it would always compile frontend shaders against Shader Model 4.0, and unfortunately the AMD FSR shader that has just been added needs SM 5.0 capabilities in order to work.
* While HDR already works on the UWP version on PC, on Xbox there are currently several deal-breaking display issues with it, so it remains disabled there for now.
* We still need HDR implementations for other modern graphics APIs, like Vulkan (and Metal and/or OpenGL core if possible). We have no ETA on when this will be done. Ideally a generous contributor submits it to us, just like what happened with D3D11/12.
* Slang [the shader format] will need HDR support as well in order to take full advantage of the expanded gamut. Right now the author that made the D3D11/12 implementation made a reference shader that he says can already take advantage of HDR – check out his new shader ‘integer-scaling-scanlines.slangp’. You can find this preset inside the folder ‘scanlines/shaders’. It is an integer scaling mode pixel perfect scanline shader for use with low resolution monitors, underpowered machines, the new HDR mode in RetroArch and for people who want pixel sharp scanlines with absolutely no moire patterns (but with the downside that integer scaling must be on and so not fill up the screen or over fill the screen).
* It needs to be pointed out that HDR support on Linux in general is very premature right now compared to Windows. Windows happens to be a bit further along at this point in this department. Hopefully this inequality will be addressed shortly. But just know that this might tie our hands a bit.
Boy is RetroArch 1.9.9 going to be a doozy this weekend! On top of HDR for Direct3D 11/12 and AMD FSR support, the RetroArch 3DS port will also be gaining a bottom interactive touchscreen menu for the first time! #RetroArch #3DS pic.twitter.com/RXV3YWd4AS
— libretro (@libretro) September 4, 2021
A fully interactive touchscreen menu for the bottom screen of the 3DS has been added by the very generous contributor bulzipke!
The following functions are currently available on this screen:
Resume Game
Toggles RetroArch menu, closes it and goes back to the game.
Create Restore Point
If you touch this, save it to SD card.
If the Save State Thumbnails option is enabled, you can see Screenshots at the Load Restore Point
Load Restore Point
Shows the date when you saved it. (And show Screenshot if exists). If you change the State Slot, bottom menu will refresh Screenshot / date / state.
Some important convenience features came as a result of this too. Savestate loading / saving to RAM instead of to disk was added, so it’s possible to have temporary suspend points without writing to disk. The state is only saved to disk when either:
* Closing the lid of the 3DS
* Pressing the HOME button
* Exiting RetroArch
This gives things a very seamless feel. Not only that, the saving of state to RAM is orders of magnitude faster vs. saving to disk, so now while doing these operations, things no longer slow to a crawl.
There’s also the option to disable the bottom screen –
Settings->User Interface->3DS Bottom Screen
Although this option will not affect performance, it is estimated that “Tap the Touch Screen to go to the Retroarch menu” text may add additional battery consumption to draw the screen. So it’s always nice to have the option to toggle it off if need be.
AMD FSR has now been ported to the Slang format as a pixel/vertex shader! You will now be able to use it in RetroArch with any core! Will be compatible with Direct3D10/11/12, OpenGL Core, Metal and Vulkan video drivers! https://t.co/tW2zICOd4r #RetroArch #AMDFSR #Slang pic.twitter.com/yqbOa1WRJQ
— libretro (@libretro) September 2, 2021
A very generous contributor submitted a fully working implementation of AMD FSR as an slang shader for use in RetroArch! This shader should be fully compatible with the following video drivers in RetroArch:
* Metal
* OpenGL Core (or at least 4.0 with regular OpenGL driver)
* Vulkan
* Direct3D 11 (if your card supports Direct3D 11 Feature Level 11.0 or higher)
* Direct3D 12
We have had to update our Direct3D 11 driver to allow for the use of Shader Model 5.0 when your GPU supports it, since this shader requires SM 5.0 features and wouldn’t work on D3D11 without it.
The contributor mentions in his pull request that implementing AMD FSR as a pixel shader seemed to work out just fine despite AMD insisting it is supposed to be implemented as a compute shader.
On top of this straight port of FSR, he also took the time to remake the SMAA shader. It is now supposed to be less of a port and just uses the original library unmodified, while adding a few features and higher quality search textures. The contributor wasn’t too happywith the quality of this AA and wanted to check if it could be improved, mainly because FSR requires good looking AA (Anti-Aliasing) otherwise it wouldn’t make much sense. In the end, quality gains were marginal, pretty much imperceptible. Despite that, there is also an AMD FSR+SMAA preset that you can use.
You can see some comparison images down below – to the far left is the image without any shaders, in the middle is AMD FSR, and to the right is AMD FSR + SMAA applied.
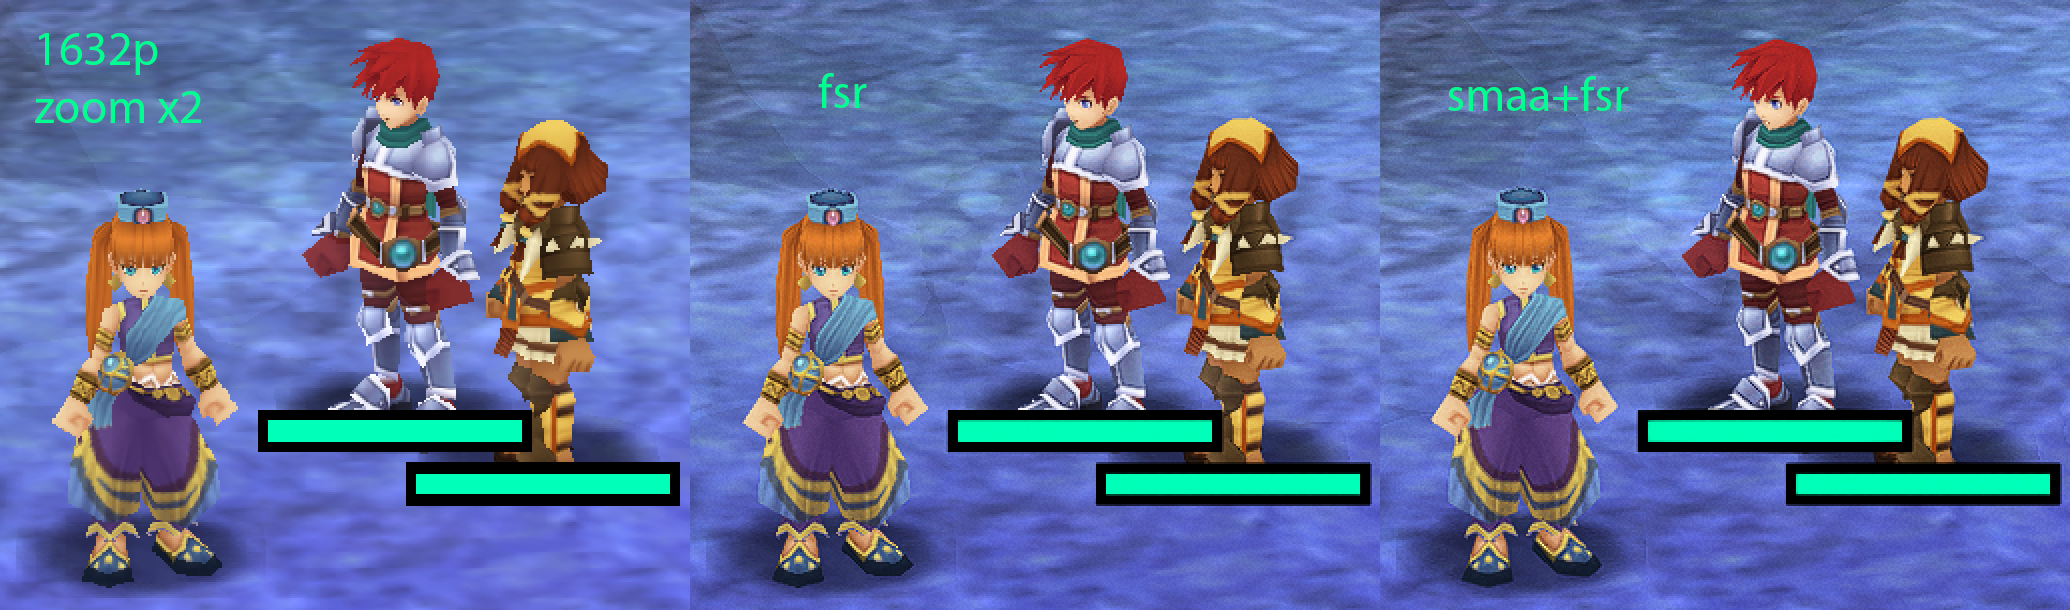
Ys Seven undub with the PPSSPP core in RetroArch. The image is zoomed in here by 2x. Left: no shaders, middle: AMD FSR shader, right: AMD FSR + SMAA.

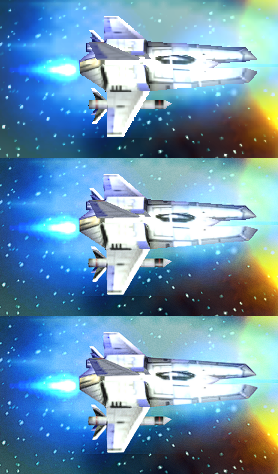
1st image: Gradius V with the PSCX2 core in RetroArch, zoomed in to showcase how FSR can combat aliasing. Left: no shaders, middle: AMD FSR, right: AMD FSR + SMAA. Note how the jaggies become less pronounced by applying FSR, and how they become even less with SMAA added to the mix.
2nd image: Gradius V with the PCSX2 core in RetroArch, zoomed in. Top: no shaders, middle: AMD FSR, right: AMD FSR + SMAA.

3rd image: Panzer Dragoon running on Kronos with AMD FSR shader (click on the image to see it without shader applied).
1.9.9 adds enhanced search functionality to the Quick Menu > Cheats menu, similar to that in the core downloader and core manager menus:

In addition, the search feature may be used to filter cheats that are currently on or off: this is done by searching for the ‘key’ string .on or .off
* The key string is case insensitive
* The actual on/off text is localised – it matches whatever is currently shown as the cheat value (i.e. if the user language is set to French, the on key is .Activé
* The leading period was chosen because (a) it should be available on most keyboard layouts, (b) it is available on the first ‘page’ of RetroArch’s OSK and (c) it is easier to type than enclosing the string with brackets, as it is displayed in the cheat value text

Previously, the audio sinc resampler and the audio conversion functions only had optimized SIMD codepaths written in ASM for ARM NEON. There are more and more platforms/toolchains now that prohibit or make it difficult to use assembly routines, or strongly recommend you resort to SIMD intrinsics instead.
So we have done exactly that now. All the audio conversion routines (float to signed 16bit integer, signed 16bit integer to float) and the sinc audio resampler now have ARM NEON intrinsic optimized codepaths available instead of just defaulting to C codepaths. This should contribute to performance on platforms like the Mac M1, Android devices, the PS Vita, iPhone devices, and ARM Linux hardware in general (both AArch64/ARMv7).
We have still left in these legacy ASM codepaths behind an ifdef in case someone still has a use for it, but from now on we will try to make sure to offer both intrinsic and ASM codepaths whenever possible, or intrinsic only if both can’t be provided.
Fix cheat when using second instance runahead
Before, using cheats when second instance runahead was enabled caused undefined behaviour because the cheats are only applied to the primary core (and not the secondary one). 1.9.9 fixes the issue. It also ensures that cheats are correctly reapplied when second instance runahead is toggled on while content is running.
Fix menu sounds (audio mixing) when using the ‘sinc’ resampler with quality lower than ‘normal’
Before, if the sinc resampler was used with a quality of lower or lowest, then enabling any ‘menu sounds’ (including cheevos notifications) would completely break in-game audio. 1.9.9 fixes the issue by ensuring that all audio mixer resamplers use the same quality setting as the main one. In addition, we ensure that the same backend driver is used.
1.9.9 also fixes a memory leak when loading system sounds without a driver reinit (i.e. when toggling menu sounds via the menu)
Fixed several crashes that could occur during fullscreen toggle
Fullscreen toggle should now be more robust in cores like PCSX2, Flycast and other 3D-based emulator cores.
Add option to (force-)write current core options to disk
RetroArch saves core options automatically when closing content – but if a badly behaved core causes a crash on close content, then the current core option settings will be lost.
1.9.9 adds a new Flush Options to Disk entry to the Quick Menu > Options > Manage Core Options menu. When selected, this will force the current core options to be written immediately to the active options file.
Since 99% of users will not need this functionality (it was requested for users testing the PCSX2 core) the entry is hidden by default, with visibility controlled via a new Settings > User Interface > Menu Item Visibility > Quick Menu > Show ‘Flush Options to Disk’ option.
This PR also fixes a rather nasty bug related to saving core options: At present, if a user has Use Global Core Options File enabled, and they create then delete a per-game or per-content directory options file via the Manage Core Options interface, when the current options are re-saved to the global file then any settings not related to the current core will be removed (!). This has been fixed by ensuring that all locally stored config file data is properly updated whenever per-game or per-content directory options files are deleted.
Highlight currently selected value in Shader Parameter drop-down lists
Before, when opening a shader parameter drop-down list via Quick Menu > Shaders > Shader Parameters, the selection cursor would always ‘reset’ itself to the top of said list. 1.9.9 ensures that the current parameter value will be auto-selected and marked.
Note that we may replace these shader parameter drop-down lists with keyboard input at some point, but we might as well fix this selection bug in the meantime (since it is so easy to do!).
Allow ‘Vertical Refresh Rate’ to be entered manually via keyboard/onscreen keyboard
Making significant changes to Settings > Video > Output > Vertical Refresh Rate (e.g. 60 Hz -> 50 Hz) is quite tedious, since holding left/right only modifies the value in 0.001 Hz steps.
1.9.9 adds the ability to set this parameter ‘manually’. When Vertical Refresh Rate is selected, a new value can be entered via the OSK or physical keyboard.
For current settings where very long dropdown lists are spawned, we might consider switching over to this style of input instead.
Linux – udev – Look for “ID_INPUT_KEY”, not “ID_INPUT_KEYBOARD”
Very important contribution by icculus (of SDL fame) –
This fixes programs using /dev/uinput to create a virtual keyboard failing to be detected on startup. Usual symptom is some sort of GPIO-based controller on a Raspberry Pi that looks like a keyboard to the OS and can control EmulationStation, but fails to work in-game unless you restart the controller’s program while the game is running (in which case udev_input.c’s hotplug code, which was using the correct string, would pick it up).
Core info cache files are now portable
Core info cache files should now be portable.
The core info cache stores absolute core paths, which breaks portability (i.e. if the cache is enabled and the core directory is moved, cores can no longer be loaded).
In truth, it is a mistake to cache the core path in the first place, since this is already retrieved from the filesystem regardless of whether the cache is enabled. 1.9.9 therefore removes core paths from the info cache, so the correct (dynamically determined) path is always used.
As a result, iOS now has core info cache files re-enabled again, which should lead to an increase in overall core info performance.
1.9.9
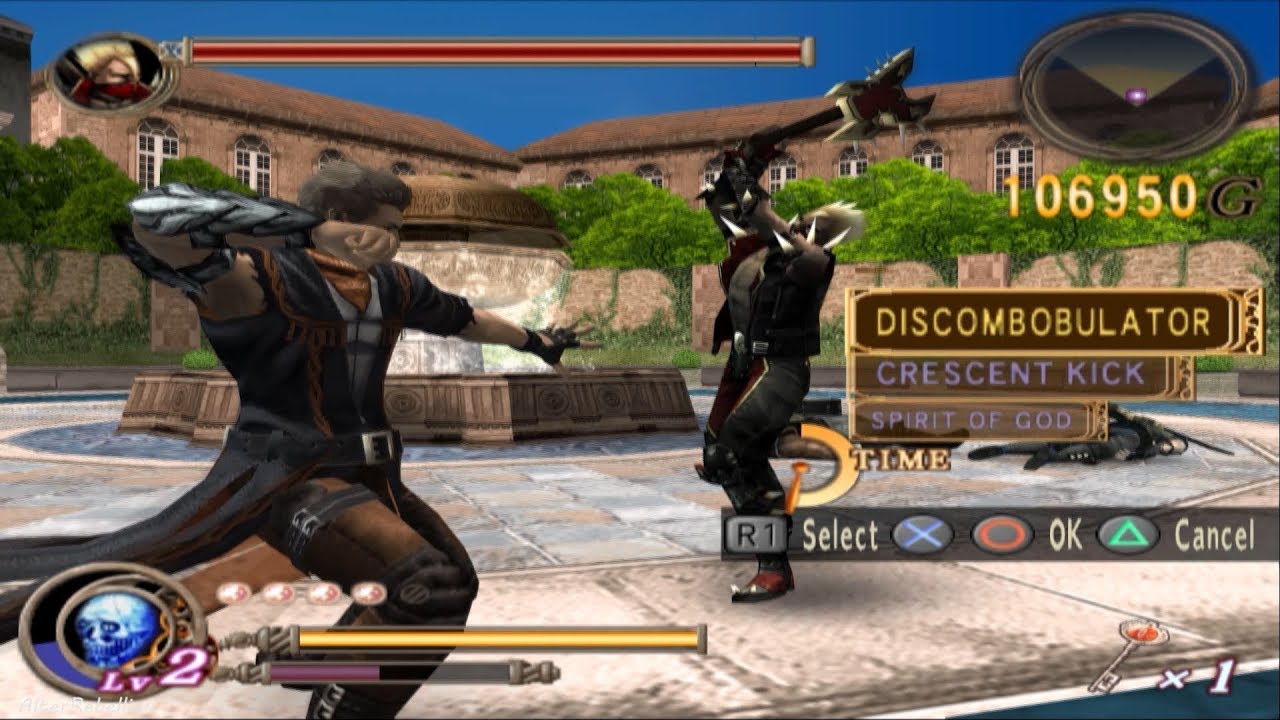
We’re very excited to share with you all the work we’ve been putting into the PCSX2 core as of late.
As a general baseline, Libretro strives to make sure that the cores we self-maintain are fairly portable. We’d like not to have the user to require to install several data files inside the System folder in order for an emulator core to work. The problem with the PCSX2 core up to this point was that it was too much of a straight port – PCSX2 by itself writes to dozens of files during startup and logging. However, it also has many config files scattered about the place.
We have cut all this config file reading/writing. Now, the only configuration file that gets written to is the ever-trusty ‘core options config file’ from Libretro/RetroArch.
Furthermore, the only files you need to have in your
Other under the hood changes: all the internal GS shaders are now embedded as strings into the GS renderer instead of being loaded in as resource files. We have also spent a lot of time reducing WxWidgets UI dependencies, although we are not quite there yet all the way. The core should also be way smaller as a result. It used to be as big as 10MB but now clocks in as low as 7MB or less.
The core now also uses an internal game database (see here). This is converted at compilation time into a header file and baked into the core. This way, we once again do not require the user to have this game database file inside his/her system folder. Instead, the core comes with nearly everything that the user would need to get started.
The core used to have many runtime library dependencies before and therefore be quite nonportable across Linux distributions. We have since severely lessened our dependencies on external system libs. Glib, X11 and Libpng have all been eliminated as are other things.

The core now has an embedded widescreen patch database. We are going to try and keep this database updated as time goes along. Many thanks to the members of the PCSX2 Forums for posting all these wonderful patches.

Many PS2 games render in interlaced resolutions. While this might have looked fine on a CRT TV, this can lead to bad image quality when running these games on a modern LCD or OLED display.
Many no-interlacing patches have been written for PS2 games running in PCSX2. These usually come in the form of .pnach patches. However, what we’re attempting to do here is apply these automagically. We want to give the user a seamless experience where they can just insert the game and we try to apply the right no-interlacing patch behind the scenes to make it look as users would expect without having to fiddle with deinterlacing settings.

So, what we have done is implement a ‘No-interlacing patch’ option to the ‘Deinterlacing’ setting. You don’t need to manually source together a bunch of .pnach patches – simply make sure you set ‘Deinterlacing’ to ‘No-interlacing patch’, and start up the game. If the internal database has an entry for the game, a popup message will show up saying that a no-interlacing patch has been applied. NOTE: The no-interlacing patch is only applied once at startup. If you change it mid-game, you will have to restart PCSX2 in order for these changes to take effect.
In some cases, a game might have a built-in option to remove interlacing. This is what was commonly known as the Progressive Scan option, and it was enabled in many games in the US by press and holding Square and Triangle at startup. For games like Soulcalibur 2/3 and Tekken 4/5, it will then ask you to boot to this progressive mode.
We hope that we can find patches to automate this procedure as well, so that the user doesn’t have to do this manually. In some cases like Tekken 4, people are returning empty handed, for the Gran Turismo games it’s been reported that with the proper patch, it can be changed into always loading in progressive mode.
NOTE: If it can’t find a non-interlacing patch inside the database for the game, it will have the same effect as if the setting were 0 – no deinterlacing will be applied.
Here is a list of all the games we currently have no-interlacing patches for.
IMPORTANT PERFORMANCE HINT: No-interlacing patches (when applied) can be significantly lighter on your GPU’s resources vs. deinterlacing. We can skip several rendering pipelines when we render a non-interlaced image vs. an interlaced one, because the odd and even lines need blending, which is done with separate shader passes.
Many thanks to the members of the PCSX2 Forums for posting all these wonderful patches. If you have new no-interlacing patches you’d love to add to the PCSX2 libretro core, please do not hesitate to contact us. We’d love your contributions.

We have implemented an integrated 60fps patch database for a select number of games.
We do have some standards as to which patches we will include. If framerate unlocking results in the game running at double speed, we don’t include the patch. The game has to be able to run at least normally at proper speeds. There can be small inaccuracies like certain physics or animations not updating at a proper 60fps rate, but these we consider to be nonessential.
Please keep in mind that these 60fps patches will increase the system requirements severely in some cases. In some rare instances (like Silent Hill 2), the game might internally slow down at certain spots when experiencing heavy EE/GS load. In such cases, a generous Emotion Engine overclock could help alleviate this. Unfortunately, we have not yet hooked up Emotion Engine/CPU overclocking as a core option, but we intend to do so soon.
Here is a list of all the games we currently have 60fps patches for. For some games, you might need specific versions of the game (from specific regions). We are trying to test the codes per-game first to ensure they meet our minimum standards (see above).
We can tell you that playing some of the games in the list above at 60fps is a transformative experience. If you have the system specs for it, definitely consider replaying your PS2 games again at much smoother framerates.
Many thanks to the members of the PCSX2 Forums for posting all these wonderful patches. If you have new 60fps patches you’d love to add to the PCSX2 libretro core, please do not hesitate to contact us. We’d love your contributions.
We have expanded the amount of core options considerably. Later on we also want to add support for the newly added core option categories that you can see in RetroArch v1.9.8 right now. This will significantly reduce the clutter onscreen when browsing the core options.
Finally, there have been plenty of backports and updates.
Do note that our current core is:
1) more recent than the last PCSX2 stable (1.6.0)
2) is basically following standalone upstream master in terms of development but with severe tweaks for better libretro integration
3) is using the x64 JIT code. This is a new codepath that is less well tested than the 32bit codepath, but it’s the future regardless.
Here are some tips you might be able to appreciate:

If you experience heavy latency – You could experiment with the option ‘Emulation: Vsyncs in MTGS Queue’. Try lowering this to 1 or even 0. Depending on the amount of lag frames a game has, this could cut down on the latency severely, at the expense of some slight performance. 2 is the default but you might want to turn this down lower.
If a game has vertical lines across the screen – Try turning on a setting like ‘Merge Sprite’ or ‘Align Sprite’. Usually this takes care of the issue. This can be game specific. We intend to automate this for the problematic games in the near future, so you don’t have to.
If OpenGL performs too slowly and you’re on Windows – You could always try the Direct3D 11 renderer. While this renderer has less blending options than GL, it can sometimes be significantly faster than the GL renderer. So it’s definitely worth a try.
We have been notified that the latest dashboard updates on the Xbox systems have decreased compatibility of the PCSX2 libretro by a fairly significant amount. This comes as a bit of unfortunate timing with this blog post. We haven’t had the proper time yet to look into this issue, and we don’t know if it will even be fixable in the short term. Nevertheless, we will take a look regardless and move from there.
RetroArch 1.9.8 has just been released.
Grab it here.
If you’d like to learn more about upcoming releases, please consult our roadmap here. The next version of Lakka (with an updated RetroArch 1.9.8 version) is scheduled to be released a week from today.
Remember that this project exists for the benefit of our users, and that we wouldn’t keep doing this were it not for spreading the love to our users. This project exists because of your support and belief in us to keep going doing great things. If you’d like to show your support, consider donating to us. Check here in order to learn more. In addition to being able to support us on Patreon, there is now also the option to sponsor us on Github Sponsors! You can also help us out by buying some of our merch on our Teespring store!

We added support for OpenDingux before for JZ4770-based handhelds. After this, we added support for RetroMini RS-90 devices.
And now thanks to Poligraf, we have a working build for all the JZ4760-based handheld devices running RetroFW. RetroFW is a Dingoo based firmware runnin on the MIPS 4760 which is around 50% the speed compared to other devices running Opendingux.
Which devices does this cover?
A full listing can be found here.
We have been told these cores all run well on the hardware.
All of these low powered handheld devices help us tremendously in optimizing our cores for the low end spectrum of hardware devices. gpSP, PCSX ReARMed and Picodrive are already starting to reap the benefits of it.
We are going to be making a persistent effort now to enhance RetroArch’s UX and lower the acessibility curve. To that end, we now have also implemented core option categories support.
Up to this point, every core option in a core (Quick Menu -> Options) has all been shown in a a flat alphabetical list. Users can quickly get confused if they have to scroll down a massive list of options.
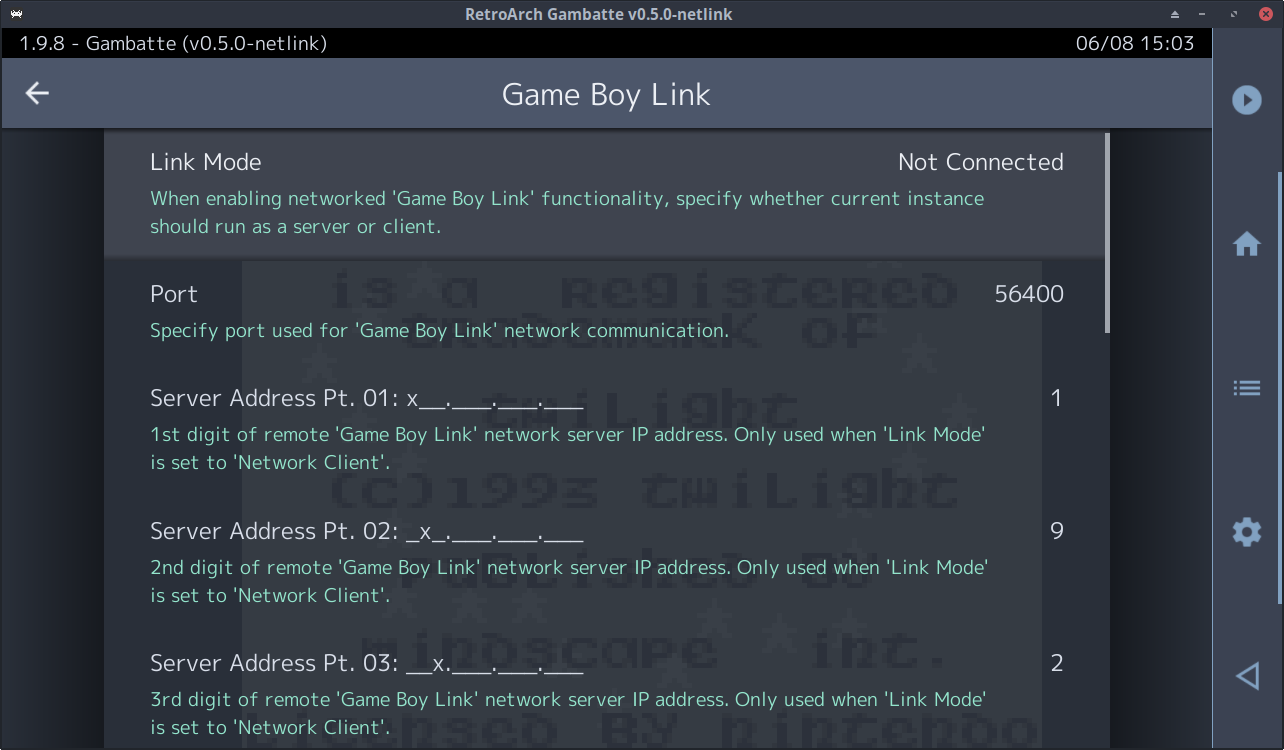
So, 1.9.8 finally adds core option categories. Options assigned to a category will be displayed in a submenu of the main core options menu on supported frontends. For example – here we assign Gambatte’s mulitplayer options to a Game Boy Link category:
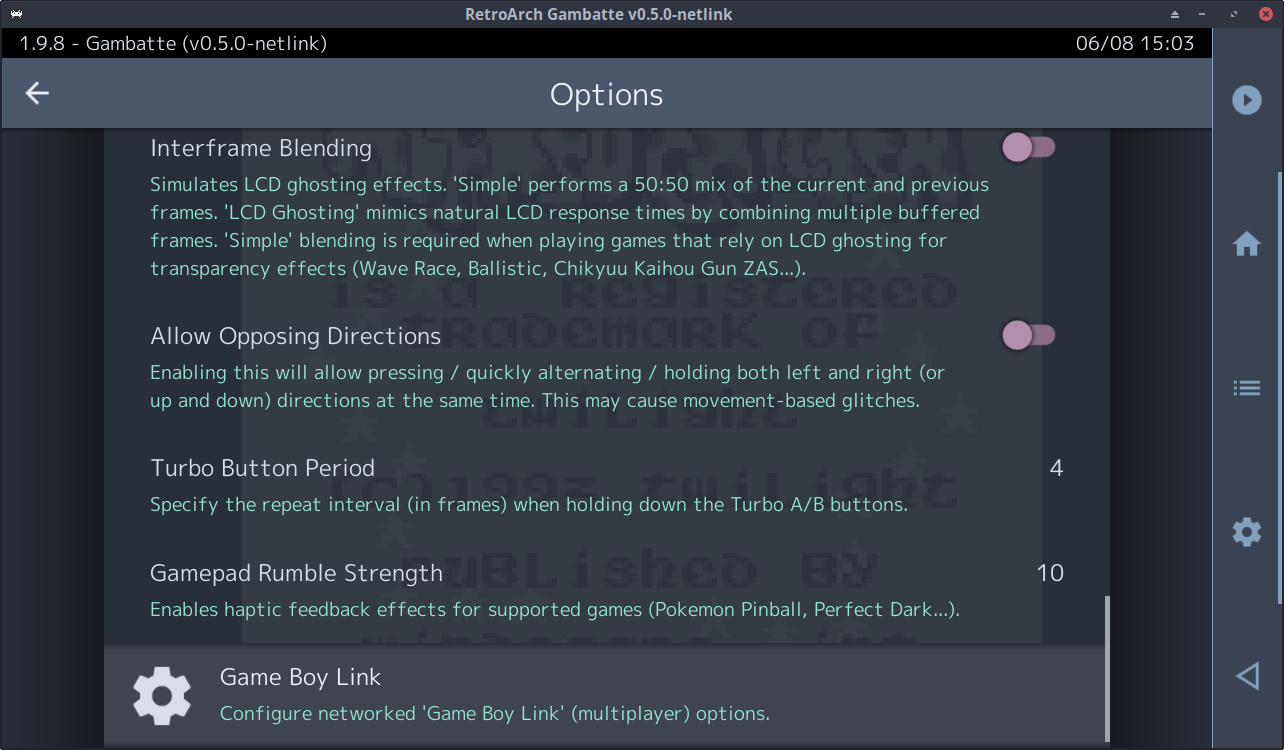
If you do not like this new behavior, there are always options to turn it off. Go to Settings > Core > Core Option Categories setting (enabled by default). When disabled, core option categories are ignored, and core options will effectively be displayed using the old v1 format.
Core option categories have to be specifically added per core. Some of the cores that already support core option categories are as follows:
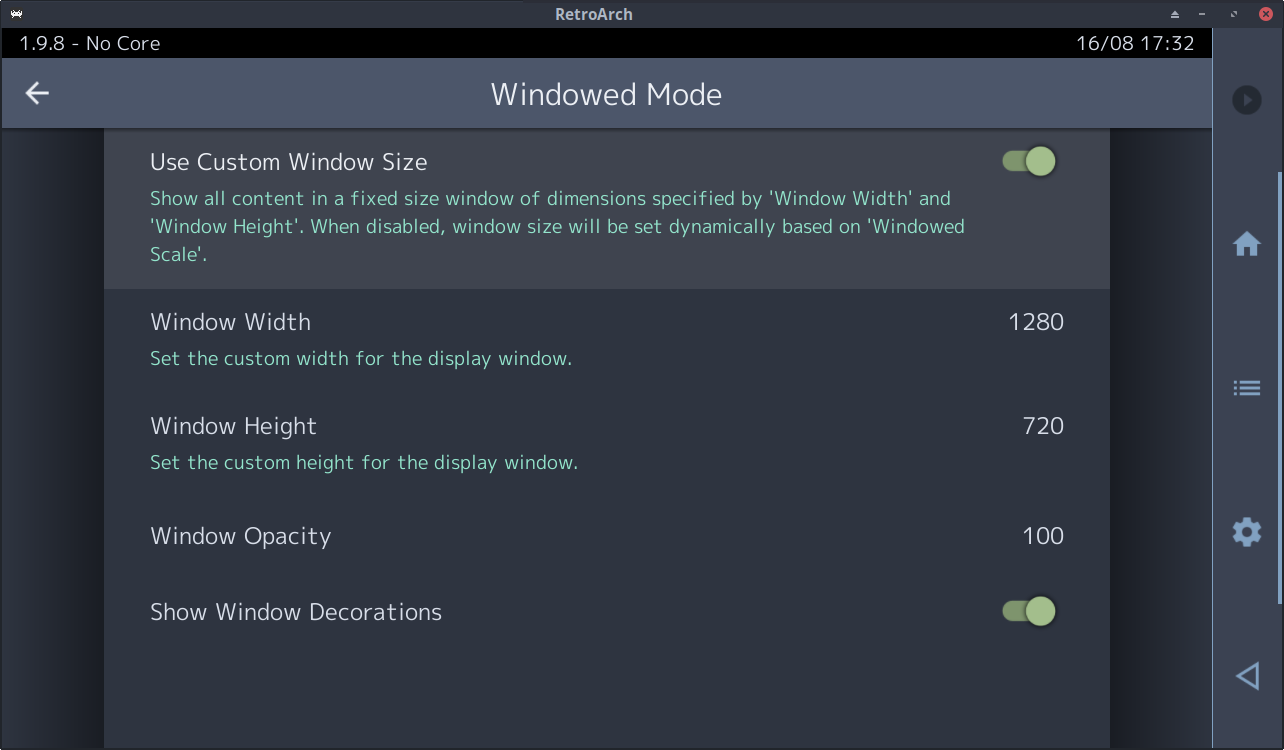
Have you ever noticed RetroArch starting a game in windowed mode and then blowing up the window to ridiculous sizes that exceeds the boundaries of your desktop? Well, we now have a solution for that!
At present, when RetroArch is in windowed mode with Remember Window Position and size disabled, the window size will be equal to the core provided base_width/base_height multiplied by the Windowed Scale. This is potentially ‘catastrophic’: if a core has a very large base_width/base_height (e.g. PPSSPP with a x7 internal scale factor) and Windowed Scale is set to the default x3, then the window size can be enormous – potentially exceeding the capacity of the host GPU and causing RetroArch to crash.
1.9.8 adds two new options:
The PR also cleans up the Settings > Video > Windowed Mode menu, auto-hiding options where required, and re-initing drivers when toggling Remember Window Position and size. Also, since the ‘remember’ part of Remember Window Position and size is only enabled for Windows, an alternate Use Custom Window Size is provided on other platforms.
Cores are able to show or hide their options via the RETRO_ENVIRONMENT_SET_CORE_OPTIONS_DISPLAY callback on supported fontends. A significant shortcoming here is that if a change to one core option (via the frontend) affects the visibility of another option, the frontend cannot update the menu state until the core has run for at least one frame. So with the core options menu open, visibility updates cannot happen in real-time – instead, the user must toggle the quick menu off then on before the menu will change. This is ugly and confusing.
1.9.8 adds a new RETRO_ENVIRONMENT_SET_CORE_OPTIONS_UPDATE_DISPLAY_CALLBACK environment callback which allows the core to register a function that enables the frontend to (a) force a core-side option visibility update and (b) allows the frontend to check whether option visibility has changed. This means all show/hide operations can now generate real-time menu updates.
Plenty of important fixes for Windows users.
If you experienced lockups in the past when disconnecting an audio device while using the WASAPI audio driver, well, rejoice, this will no longer happen.
Simultaneous shift sticky fixes were made to the DirectInput input driver. Dinput would not send WM_KEYUP for both Shifts if they were pressed together and released, resulting in sticky Shifts
= Pinball games ruined in DOSBox.
The following fix was made to the Windows RawInput driver – the Left Alt key could get stuck when Alt-Tabbing. No more. The keyboard can now also be mapped to analog input axes, meaning you can bind the left and right analog stick on the RetroPad to your keyboard keys.
1.9.8 solves the flickering issues that appear in the cores that use the FRAME_SKIP as Snes9x2002 does.
Also, 1.9.8 basically mounts HDD partition if RetroArch actually started from the HDD unit.
In this way, we skip the mount partition if the user just wants to use USB.
Plenty of important fixes for macOS users this time!
There were several serious memory leaks with the Metal video driver. These have now been fixed.
Serious bugs related to the input autodetection subsystem have finally been fixed. Now when you connect a gamepad, it will no longer try to attach the same pad to two controller ports simultaneously. This has been a longstanding bug that we’re glad has finally been consigned to the dustbin of history thanks to the help of a generous contributor who did quite some work to delve deep into this issue. We also made sure everything still works across a wide variety of macOS machines (from a PowerPC Mac running OSX 10.5 to an Intel and ARM Mac running more recent macOS versions).
Lots of improvements have been made once again to the WiiU port.
All the libretro RPX cores are now compressed. Not only do they load faster (leading to faster startup times), but it means you have a lot more space left on your SD card.
L3 and R3 buttons have been fixed on several gamepads, they were previously completely nonfunctional.
Furthermore, promising work is underway for a PlayStation1 emulator core running on RetroArch WiiU. More on that later once more news is forthcoming.
We have been fixing several bugs with the UWP port, many of these affecting in particular RetroArch users on Xbox One/Series.
Microsoft recently released a new Dashboard update that caused some breakage for existing RetroArch installs.
We have managed to fix the startup problem that occurred on the latest dashboard. We also fixed the onscreen keyboard display which was previously completely glitched out.
Note that on the latest Dashboard, some compatibility problems still persist. For instance, it has been reported that several games on PCSX2 no longer work as of the recent update. This will require investigation and it is our guess if anything can be done about this, we will have to determine this after more investigation has occurred. For now, you might experience scaling issues with some of the ANGLE/GL powered cores like Mupen64Plus Next and Flycast because of the Dashboard update. We hope that we will be able to transition from ANGLE to something like GLon12 soon. What this would buy us is full desktop OpenGL support instead of just OpenGLES. This would mean a more complete superset of OpenGL (up to 3.3 from what we can hear), more cores that would work out of the box instead of custom cores made to work with ANGLE, etc. We will see if we succeed in this, but that’s something for a later version.
In the meantime, we have also enabled Translation features. Note that we haven’t been able to implement the Text-to-Speech accessibility feature yet, but all other features should be there now for experimentation.
We have also re-enabled the “Explore” tab on the Main Menu. We haven’t found any issues with this anymore after the recent bugfixes/improvements we made to the underlying database code, but let us know if there are any more issues on that front.
Several cores that used the libretro VFS subsystem and/or CHD loading previously no longer worked. Examples include the Beetle cores. This has been fixed.
Currently the “Screen Resolution” list wrongly alters also video_refresh_rate to the rounded value, as in 59.940 Hz becomes 59.000.
This change makes sure all the 59.94 multiples (59/119 etc) result in the proper float value instead of integer.
Also, previously notifications when setting the refresh rate would repeat itself twice. This has been fixed.
1.9.8
It has been often requested during our project’s history, but yes, we finally want to do something on the UI/UX front. We have been considering introducing an ‘Easy Mode’ that should aim at making things much less of a maze to navigate for non savvy users.
Stay tuned for more info!
This is a guest article written by David GF Net republished with his authorization. Original blog article can be viewed here.
Last year I got involved in Libretro/Retroarch development after buying an Odroid Go Advance. During this time I’ve been working mainly on gpsp and porting it to new devices and such.
One of the main issues about working in software is testing, and as you can probably imagine there’s no tests in most emulators. Partly due to bad practices and because it’s hard to write tests for them. That’s why I came up with miniretro. It is a libretro frontend designed for headless operation, so that it can be used for end-to-end/integration testing. The frontend runs a core and a rom with fake inputs and grabs the output.
Some of the emulators (like gpsp) feature a dynamic recompiler (aka dynarec), which have platform specific (CPU, OS and/or device specific) backends targeted at them. These can translate original console instructions into your device’s instruction set (for speed). Since this is device specific, it’s hard to write, debug and test. One needs a toolchain for the platform and a physical device to test it. Or at least that’s the theory!
With miniretro it gets easier to test other platforms like for instance ARM and MIPS devices. Since it is simple (almost no dependencies) and just a Linux binary, we can use Qemu userspace emulation to run our tests! This way there’s not need for a physical device, nor manual testing.
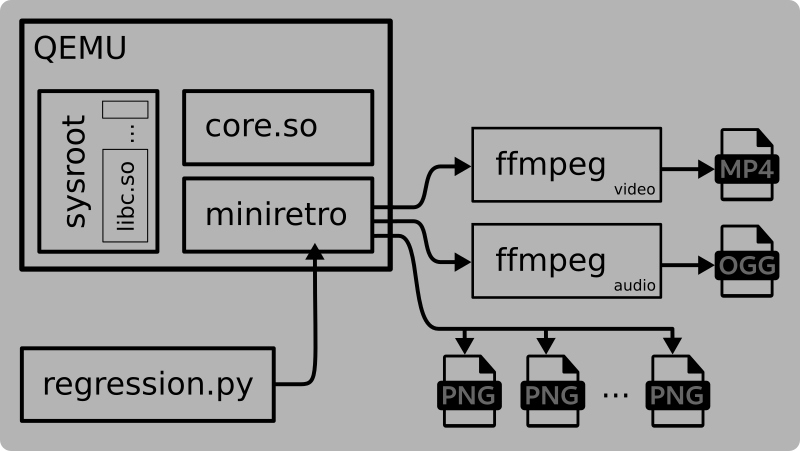
The following diagram shows how it works: miniretro and the libretro core are built for the specific device/architecture and they run under qemu. Qemu takes care of translating syscalls into host syscalls, so there’s no need for a whole OS to run the program. Miniretro can open pipes and other IPC communication channels to input/output any data.
Diagram of Miniretro running under Qemu
Just as an example, let’s build picodrive, gpsp and pcsx for armv6 and mips32. To do this you will need a toolchain. In my case I’ve been using some Linux-generic toolchains for a variety of platforms, such as ARM, MIPS, x86 and PowerPC, freshly built using Buildroot (you can find them at my Copr if you use Fedora, see this repo). This, coupled with the regular Qemu userspace emulators (available in most Linux distros), enables us to test our emulators on a bunch of platforms effortlessly.
# Build the three emus for arm and mips
git clone –recurse-submodules https://github.com/irixxxx/picodrive.git && cd picodrive
make platform=armv CC=/opt/buildroot-armv6el-eabi-uclibc/bin/arm-linux-gcc -j10 -f Makefile.libretro all && \
mv picodrive_libretro.so picodrive_libretro_arm.so && make -f Makefile.libretro clean
make platform=unix CC=/opt/buildroot-mipsel32-o32-uclibc/bin/mipsel-linux-gcc -j10 -f Makefile.libretro all && \
mv picodrive_libretro.so picodrive_libretro_mipsel.so && make -f Makefile.libretro cleangit clone https://github.com/libretro/gpsp.git && cd gpsp
make platform=armv CC=/opt/buildroot-armv6el-eabi-uclibc/bin/arm-linux-gcc -j10 all && \
mv gpsp_libretro.so gpsp_libretro_arm.so && make platform=armv clean
make platform=mips32 CC=/opt/buildroot-mipsel32-o32-uclibc/bin/mipsel-linux-gcc -j10 all && \
mv gpsp_libretro.so gpsp_libretro_mipsel.so && make platform=mips32 cleangit clone https://github.com/libretro/pcsx_rearmed.git && cd pcsx_rearmed
make platform=armv CC=/opt/buildroot-armv6el-eabi-uclibc/bin/arm-linux-gcc -j10 -f Makefile.libretro all && \
mv pcsx_rearmed_libretro.so pcsx_rearmed_libretro_arm.so && make -f Makefile.libretro clean
make platform=unix CC=/opt/buildroot-mipsel32-o32-uclibc/bin/mipsel-linux-gcc -j10 -f Makefile.libretro all && \
mv pcsx_rearmed_libretro.so pcsx_rearmed_libretro_mipsel.so && make -f Makefile.libretro clean# Build miniretro fro arm and mips too
git clone https://github.com/davidgfnet/miniretro && cd miniretro
PREFIX=/opt/buildroot-mipsel32-o32-uclibc/bin/mipsel-linux- make && mv miniretro miniretro.mipsel && make clean
PREFIX=/opt/buildroot-armv6el-eabi-uclibc/bin/arm-linux- make && mv miniretro miniretro.arm && make clean
And finally, let’s run a full matrix of tests, choose your favourite ROMs of course!
export ARCHS=”arm mipsel” EMUS=”pcsx_rearmed picodrive gpsp”
export FRAMES=”10000″ OUTPUT=”output/” SYSTEM=”$HOME/.config/retroarch/system/”
declare -A SYSROOTS=([“arm”]=”/opt/buildroot-armv6el-eabi-uclibc/arm-buildroot-linux-uclibcgnueabi/sysroot/” \
[“mipsel”]=”/opt/buildroot-mipsel32-o32-uclibc/mipsel-buildroot-linux-uclibc/sysroot/”)
declare -A ROMDIR=([“gpsp”]=”gbaroms/path/” [“picodrive”]=”mdroms/path”)mkdir -p ${OUTPUT}
for emu in $EMUS; do
for arch in $ARCHS; do
echo “Running $emu for $arch”
./regression.py –core ../${emu}/${emu}_libretro_${arch}.so –system ~/.config/retroarch/system/ \
–input ${ROMDIR[${emu}]} –output ${OUTPUT}/${emu}-${arch} –threads=`nproc` –frames=${FRAMES} \
–driver “qemu-${arch} -L ${SYSROOTS[${arch}]} ./miniretro.${arch}”
done./report.py compare –results ${OUTPUT}/${emu}-* –output ${emu}-report.html
done
This will produce a comparison report for every emulator, where you can see a screenshot (plus some info) for each rom and each platform. It will compare any different screenshot and report it in a red background. This is very useful to compare devices but can be also be used to compare across versions of the emulator (say, on a new commit or PR).
It is also possible to produce video output directly using miniretro (if ffmpeg is installed on the system). It will output BMP and RAW PCM frames to ffmpeg which will encode them as video and audio tracks. Unfortunately there’s a bug in ffmpeg which prevents using two pipes to feed data and we are forced to produce separate streams (which can then later be muxed easily without reencoding).
I ran the above example with gpsp and arm, mips and x86 (+interpreter on x64) and got the following video (after a bit of editing with ffmpeg :P)
Likewise I ran a full test for picodrive, running 32x games:
Tooling is better than debugging for sure. I’d rather spend 1 hour creating some tool rather than manually debugging something and digging too deep. Perhaps it’s part of becoming an adult 🙂 While doing a small code change I found some weird bug in gpsp that didn’t make any sense. Instead of debugging it, I tried to compare the emulator before and after my changes. Usually this involves finding the smallest change that triggers the bug and then, compare them. Thanks to miniretro I managed to found a couple of games that would trigger the error and a small test case that caused it.
Next step was to create a tool that allows us to compare emulator cores: let me introduce you to dualretro. This simple tool takes two cores and a rom and runs them side by side in lockstep. On each frame it will create a savestate and compare them, letting you know when it found a difference. This allowed me to find the bug in a matter of minutes.
Diagram of Dualretro running under Qemu
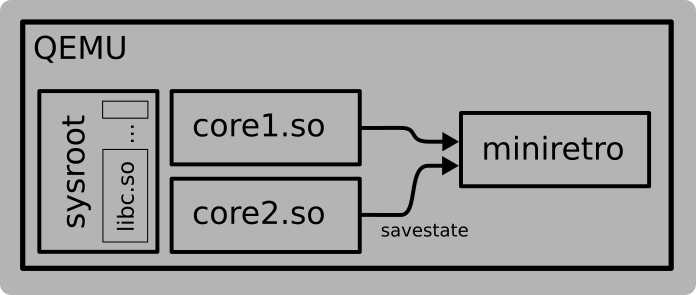
This concept can be generalized to compare frames, memory regions, audio, etc. libretro’s API provides a lot of information in a standarized way that can be used.